
Accepting and Rejecting Changes in Microsoft Word
As many of you probably know, editors usually use Microsoft Word’s Tracking Changes feature to mark their editing changes. The days of writing in red pen all over hard copies of documents are largely gone. What this means is that authors and editors can communicate by email, sending versions of the document back and forth until it’s complete. The author can view the editor’s changes and use a tool in Word to either accept or reject these changes. Whether you already know how to use Tracking Changes or not, I hope you’ll learn something in this tutorial. For the purposes of this post, let’s assume that you are the author and that you have just gotten a marked-up draft back from your editor.
Using Tracking Changes
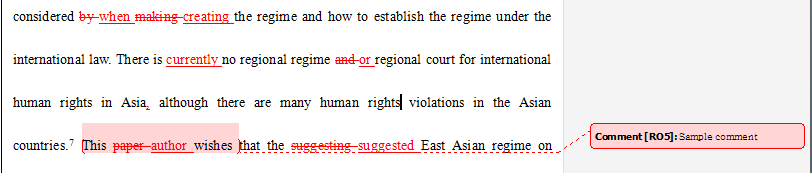
First the basics. (If you know how to use Tracking Changes, go ahead and skip to the Time-Saving Trick heading.) When you open your document, you will notice colored changes—usually red—throughout your document. Anything added is underlined, anything deleted is struck through, and any formatting changes are noted with a dotted line out into the margin, where a little bubble informs you of the change made. Like this:
Let’s say you notice that a word has been added within your first paragraph, and you’re fine with the editor’s addition of that word. You’ll want to accept the change. There are a few ways to do this:
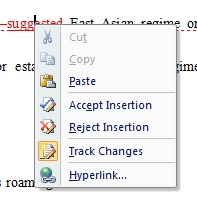
- You could right-click the red, underlined word, which would bring up the menu shown below, after which you would click Accept Insertion.
Note: The menu may also say “Accept Deletion” or “Accept Formatting Change,” depending on the type of change the editor made.
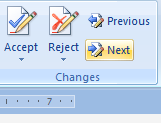
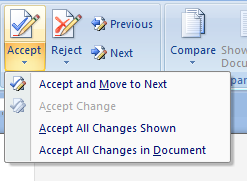
- You could click the word and click the Accept button in the Review tab. Below is an image of the Review tab so you can see where the Accept button is. It is the little white page with a blue check mark on it, to the left of the white page with a red X on it (the Reject button). Both are near the right side of your screen.

- You could click at the beginning of your document and click the Next button to jump to the first change in the document and then click the Accept button. Of these three methods, this one is the fastest.
If you disagreed with the addition of the word for some reason, you would click Reject instead of Accept, but the rest of the steps would be the same. The red underlined word would then turn black and lose its underline. It would become a normal part of your document.
Time-Saving Trick
Which brings me to the best trick I have learned for using Tracking Changes. If you have a long document or a document with many changes, clicking Accept hundreds of times can get tedious and time consuming. Here’s what you can do instead.
Start at the beginning of your document. Click the Next button in the Review tab.
This will show you the first change tracked in your document. If it’s fine, click Next again. Do not click Accept! If it’s not a change you like, either reject the change using one of the three methods listed above or make a change of your own (your change will be tracked in a different color). Keep clicking Next after viewing each change that is acceptable to you. Because you’re jumping quickly through your document, this shouldn’t take long, and because you’re using the Next button, you’re not accidentally missing any changes. When you get to the end of the document using this method, you can feel confident that you have viewed all changes, that any changes that you didn’t like have been changed so that you’re happy with them, and that everything remaining is ready to be accepted.
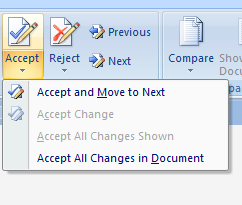
If you have not made any changes of your own to the document (other than rejecting changes), click the tiny down arrow below the Accept button. Click Accept All Changes in Document (the bottom one in the drop-down menu). You’re done!
If you made any changes to the document of your own that you still want your editor to review, click Show Markup, just to the left of the Accept button. Click Reviewers, which is at the bottom of the list. You should see both your name (or initials) and your editor’s. For the sake of this tutorial, let’s say I’m Ruth and my editor is Julia.
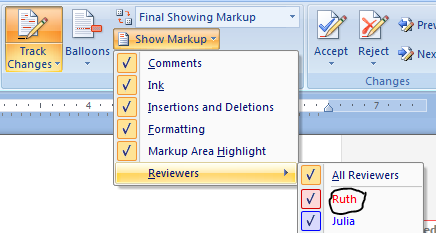
Uncheck your name (in this case, Ruth). This will hide all the changes you’ve made for the moment.
Then click the tiny down arrow below the Accept button. Click Accept All Changes Shown. If you haven’t hidden any reviewers, this option will be grayed out.
This will accept all of your editor’s changes but none of yours, which is a good thing, because your editor can now review your changes and do what you just did with his or hers. You can then go back to Show Markup > Reviewers and check your name to show your changes again. Your document should look nice and clean, with only a few of your changes remaining for your editor to review.
Depending on the length of your document and the number of changes, this trick could save you hours of reviewing time. I hope it makes the editing process easier for you.

Tracy
I have just stumbled upon this site and have enjoyed reading some of the posts. As a student translator, this pratical post will be of great help to me when proofreading and editing. Thank you.